Module 2 Lab 2 - Implement the SAP S/4HANA System API
Overview
In Module 1 we learned how to create APIs from a RAML specification in Anypoint Studio. In this next module, we will now create the SAP S/4HANA System API in the same manner using the API specification that we designed in published to Exchange in Module 2 Lab 1.
-
Create a new Mule Project with an API specification.
-
Configure the S/4HANA OData Cloud Connector
-
Implement all the flows to connect to S/4HANA
Step 1: Create a new Mule Project from the RAML
In this step we will create a new Mule application in Anypoint Studio from the S/4HANA System API RAML Definition. This will be the implementation of our REST API.
If Anypoint Studio is not open yet, double-click on the icon on the desktop.
![]()
In the Anypoint Studio Launcher, keep the default Workspace location and click on Launch
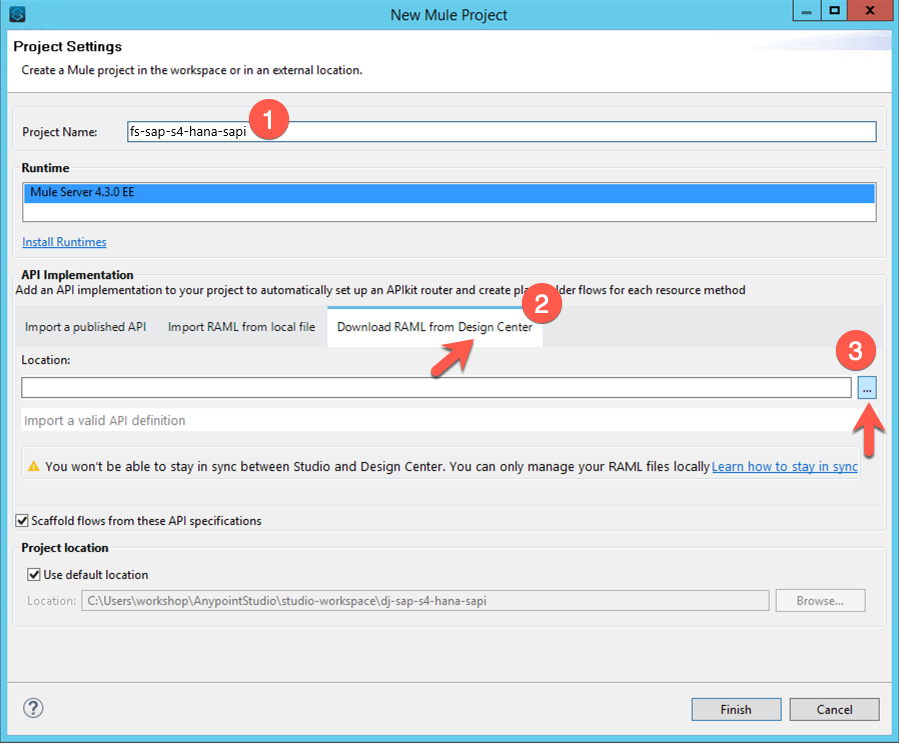
From the Anypoint Studio menu, select File > New > Mule Project to create a new project. A window will pop-up where you can define the details of this new application.
Give your project a name like the following:
Project Name: <your initials>-sap-s4-hana-sapi
|
If you can’t see the button next to the Location field, expand the window until you can see it. |
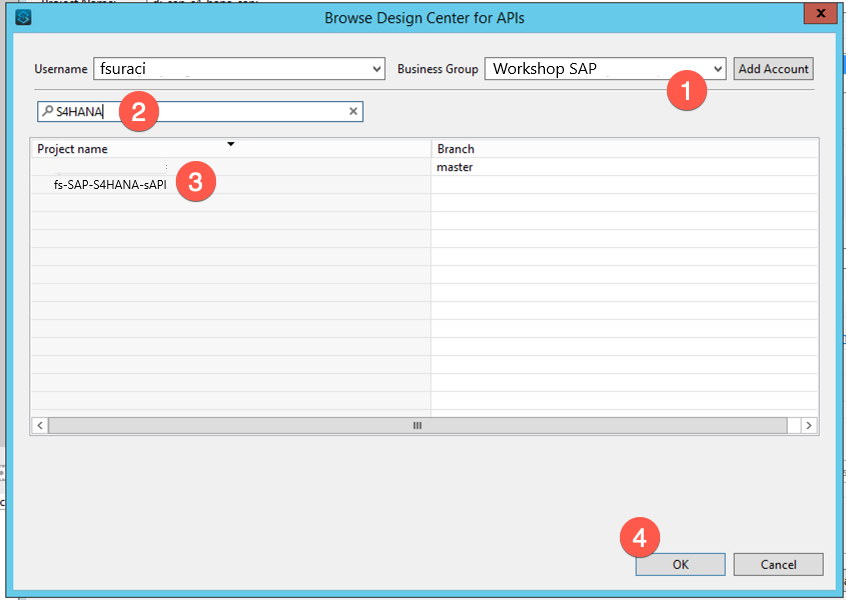
If the User login window pops up, login with your Anypoint Credentials. Otherwise, the Browse Design Center for APIs window should be displayed. We’re going to search and select the API that we designed in Lab 1.
-
Select the correct Business Group at the top right
-
Search for S4HANA
-
Select the <initials>-SAP-4HANA-sAPI
-
Click Ok
Click Finish on the New Mule Project window. This will create a skeleton project that implements your API specification.
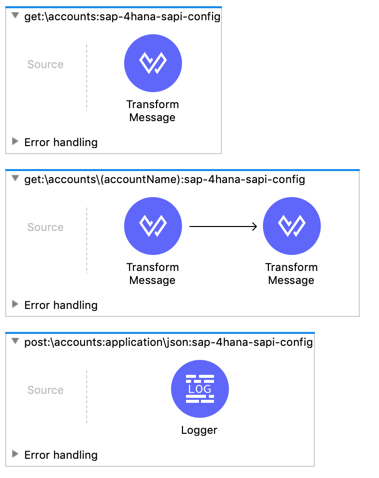
Let´s explore what was automatically generated.
At the top of the diagram you will see a flow called api-main and api-console followed by flows, one for each method defined in the RAML.
The flows below are defined by your API Design in the RAML file. Typically, there will be flows that look like this get:\resource, post:\resource, put:\resource, etc. Note that the name of the flow is very important for the APIkit router to be able to route the request to the appropriate flow - you don’t want to change these.
When APIkit detects example data in the response of a method in the RAML it inserts a Dataweave Message Transform into the flow which returns the static response specified by the example data reference.
The static response returned by the auto-generated Dataweave Message Transform allows you to test the API as a stub immediately after generation. Obviously these flows can be enhanced to provide more advanced mock services as well as evolve them into full API implementation as we will see in the next lab.
Besides the api-main and api-console flow also our two designed flow for account where created and filled with mocking data
-
get:\accounts
-
get:\accounts\(accountName)
-
post:\accounts
Step 2: Enhance the flow for the GET /accounts method
In this step we want to implement the flow to retrieve accounts from SAP and include the address data for the accounts using the SAP OData Connector.
2.1 Configure the SAP Connector
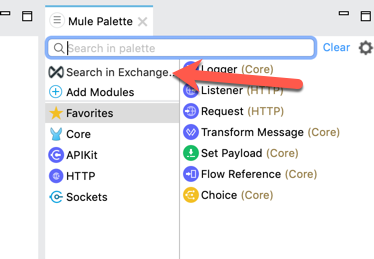
In your application canvas locate Search in Exchange on the right in the Mule Palette
-
Enter sap in the search field
-
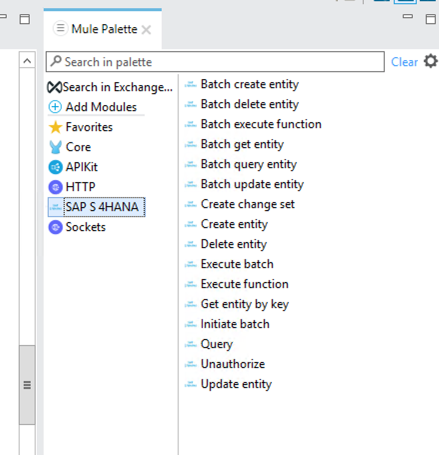
Add the SAP S/HANA OData Connector to the selected modules (latest Version)
-
Click Finish

The SAP Connector has now been added to your project
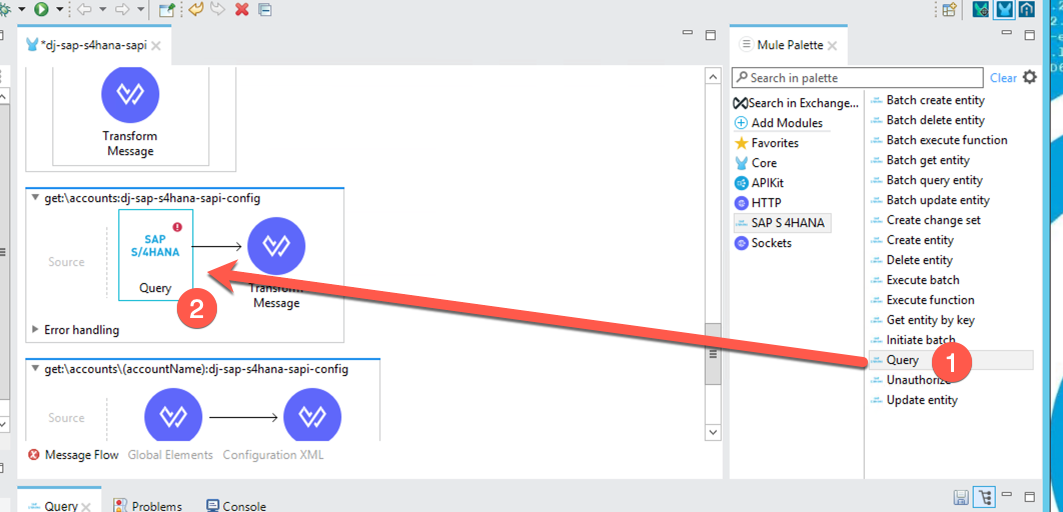
In your application canvas locate the flow named get:\accounts. Then from Mule Palette, find and select the Query operation under SAP S/4HANA, and drag the Query processor to the flow and place it before the Transform Message operation in the flow.
Below the canvas, the Query properties tab should have opened. If not, click on the Query component in the canvas again. We need to configure the connection properties for the connector next. Click the greeen plus sign next the Connector configuration field to add a new configuration.
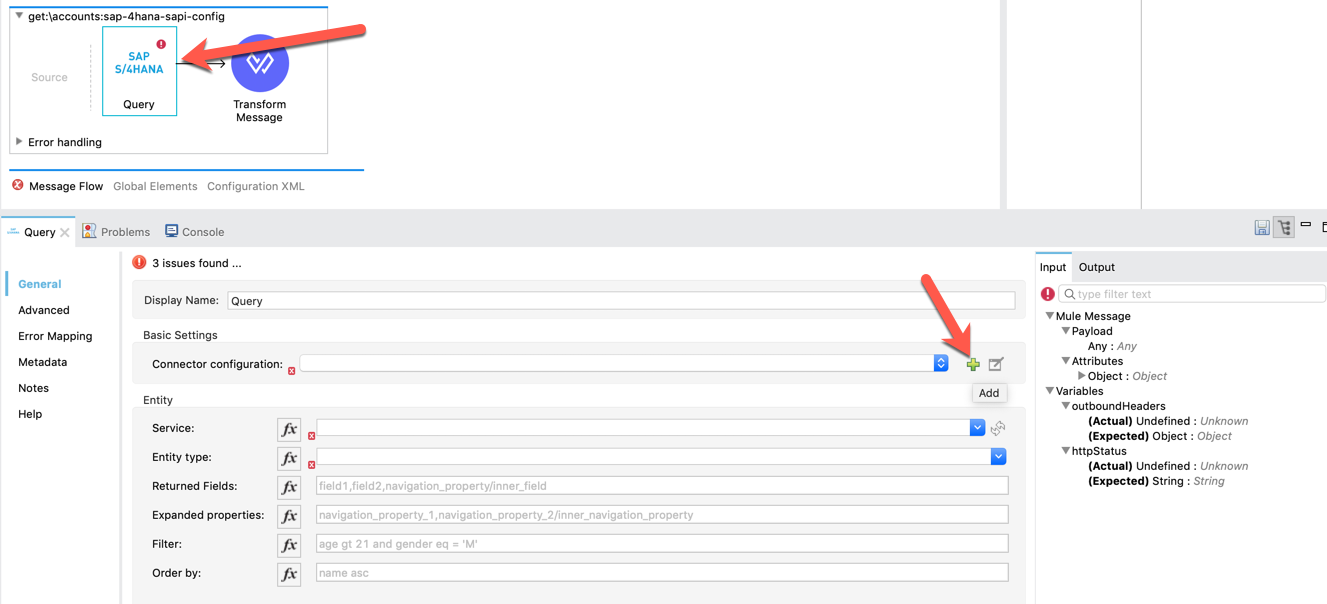
Fill in the required fields under the General tab that match the fields below. The workshop instructor will provide the credentials to you.
Service Base URL: |
<SAP S/4HANA base URL> |
Username: |
<Username> |
Password : |
<Password> |
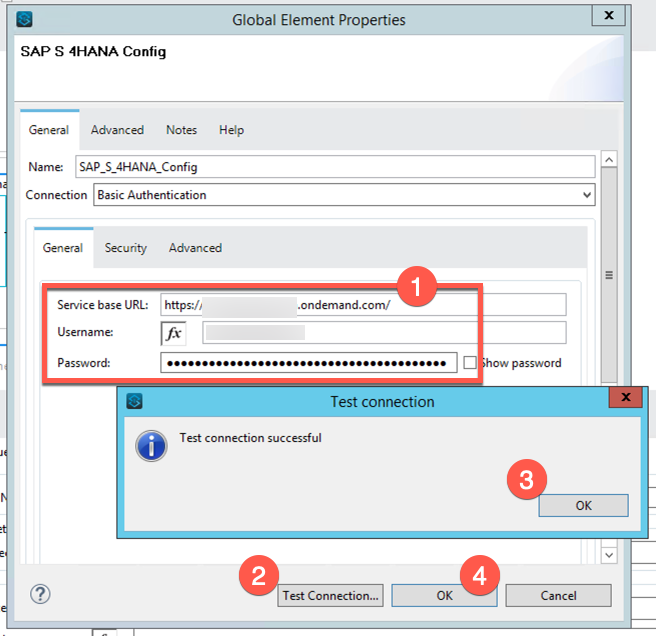
To make sure the credentials work, click on Test Connection…. If everything is configured correctly, a window showing that the connection was successful will pop-up. Click on OK and then click on OK to close the Global Element Properties window.
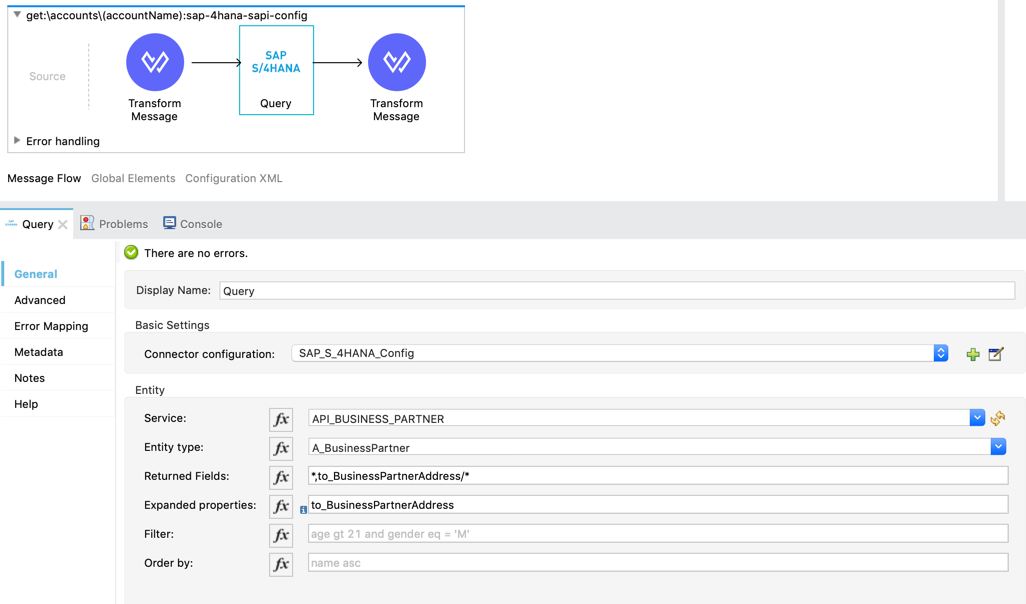
2.3 Configuring the SAP Query
With the SAP connector configuration setup correctly, we can now configure the Query operation. Click on the dropdown field for the Service field under the Entity section. You’ll see a list of all the available services. Select API_BUSINESS_PARTNER
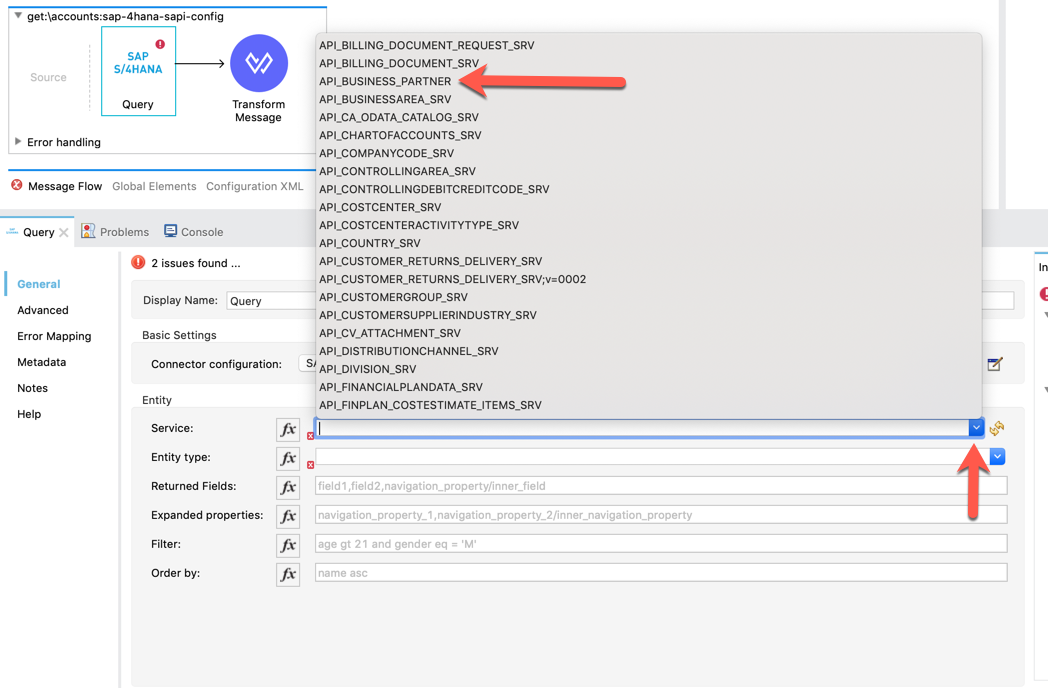
Fill the other fields as per the table below:
Entity Type: |
A_BusinessPartner |
Returned Fields: |
*,to_BusinessPartnerAddress/* |
Expanded Properties: |
to_BusinessPartnerAddress |
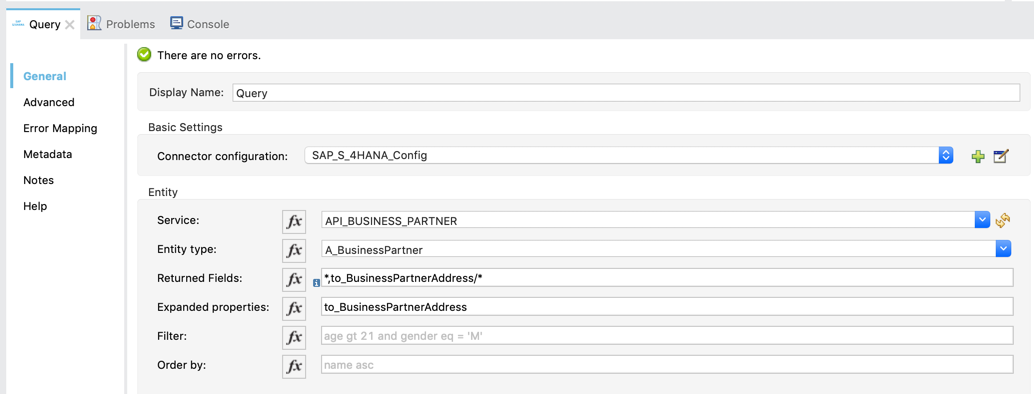
The SAP OData Connector leverages hypermedia links and helps you to experience all nested objects for your specified entity type. This helps prevent concatenative calls to the OData API and handles all objects in one process and let you experience all the returned fields in one place without having to refer to any further API documentation from SAP.
Now that the Query operation is configured to retrieve all business partner and their address details, we need to map how we want that data to be formatted when it’s returned in the API response. Click on the Transform Message that is next to the Query operation.
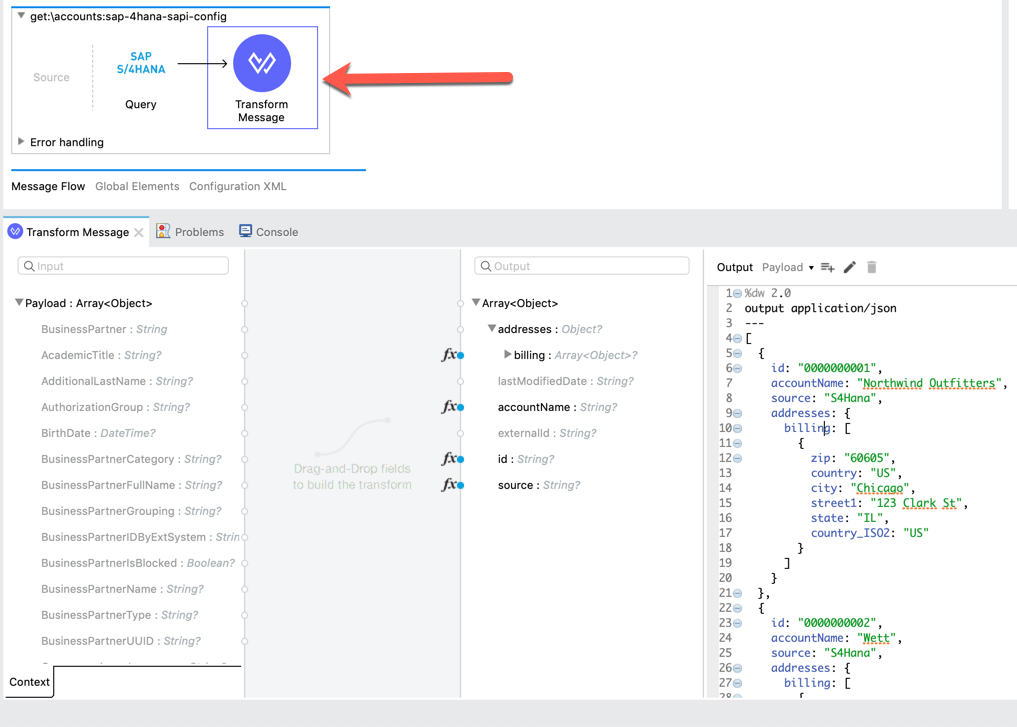
On the left hand side, you will see the list of fields returned by SAP - we can map those to our data format using "drag and drop".
In the script editor, you can see that Anypoint Studio auto-generated the DataWeave based on the API specification. We’re going to over-write the script now so that it displays data from SAP S/4HANA instead of using example data.
Using the table below, map the following fields (left to right)
BusinessPartner: |
id |
BusinessPartnerFullName: |
accountName |
The field source is not available in the provided response from S/4HANA but we can add it manually.
-
Double-click on the source field on the right in our data model
-
Change the value null to "S4HANA" manually
Now the address data - on the left scroll down to to_BusinessPartnerAddress
this is indicated to be an Array - on the right you can see the addresses object including an Array for billing
Drag the root to_BusinessPartnerAddress over to billing in order to create a new Array map
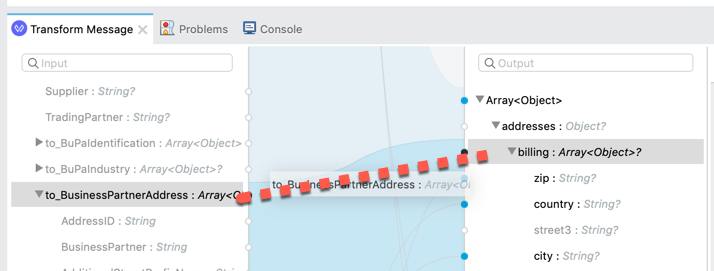
As this Array is now mapped as well, let´s continue with the property mapping
CityName: |
city |
Country: |
country |
PostalCode: |
zip |
Region: |
state |
StreetName: |
street1 |
In case you do not want to execute the full mapping or experience any problems you can take the snippet below and copy and replace the entire DataWeave script.
%dw 2.0
output application/json
---
payload map ( payload01 , indexOfPayload01 ) -> {
	id: payload01.BusinessPartner,
	accountName: payload01.BusinessPartnerFullName,
  source: "S4HANA",
	addresses: {
		billing: payload01.to_BusinessPartnerAddress map ( toBusinessPartnerAddress , indexOfToBusinessPartnerAddress ) -> {
			zip: toBusinessPartnerAddress.PostalCode,
			country: toBusinessPartnerAddress.Country,
			city: toBusinessPartnerAddress.CityName,
			street1: toBusinessPartnerAddress.StreetName,
			state: toBusinessPartnerAddress.Region
		}
	}
}
The flow is now ready. With only two components and just a little effort we have quickly unlocked data from SAP S/4HANA to allows users to easily retrieve account data with address details.
Step 3: Enhance the flow GET /accounts/(accountName) method
Let’s look at the GET /accounts/(accountName) flow next and see how easy it is to configure it to retrieve an account based on the
-
In your application canvas locate to the flow get:\accounts\(accountName)
-
In the Mule Palette locate the Query processor
-
Drag the Query processor by holding your mouse down to the flow and place it right in the middle of the two Message Transform components.
Fill the parameter with the same values as before.
!!! You might notice that you do not need to configure the Connector configuration again as it was created as a global element and will reference for all new SAP processors.
Entity Type: |
A_BusinessPartner |
Returned Fields: |
*,to_BusinessPartnerAddress/* |
Expanded Properties: |
to_BusinessPartnerAddress |
|
You can also copy a processor with CTRL+C and CTRL+V from one flow to another - the prefix Copy of will then be added. |
Try out the tip above and copy the Transform Message from our previous flow to your current flow and delete the auto-created Transform Message (the one in the end of the flow) or configure the Transform Message component the same way we did earlier. It´s up to you.
Now only one thing is missing - We have not yet filtered for an account name. Take a look at the first Transform Message component.

You can see this was also automatically created based on our API specification design. The output is not payload but set to variable - accountName. The Transform Message with DataWeave can output data to the Mule message as any of the following.
-
payload
-
variables
-
attributes
The URIparameter accountName will automatically be saved to a variable named accountName. Now we will build the searchstring to be passed to the SAP Query
-
Locate the Set Variable component in the Mule Palette
-
Drag the Set Variable component right between the first Message Transform and the SAP Query
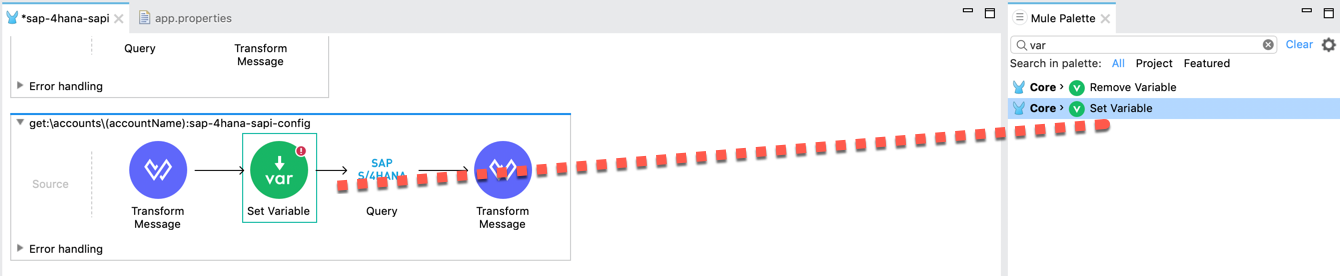
-
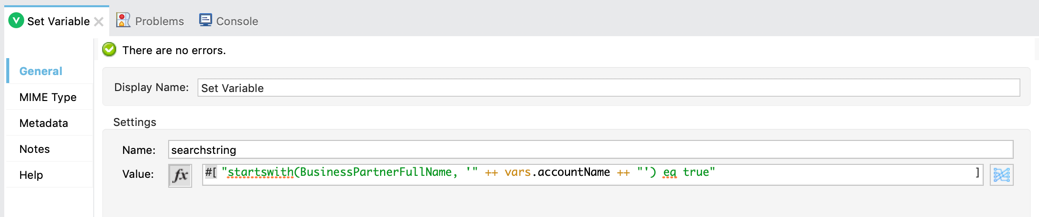
In the options of the Set Variable component fill the required fields as per the table below
-
Activate the formula button

Name: |
searchstring |
Value: |
"startswith(BusinessPartnerFullName, '" ++ vars.accountName ++ "') eq true" |
Now lets pass our searchstring variable to our SAP Query
-
Go to the options of the SAP Query
-
Activate the formular button for Filter
-
refer to the searchstring variable
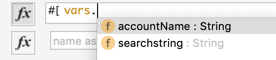
vars.searchstring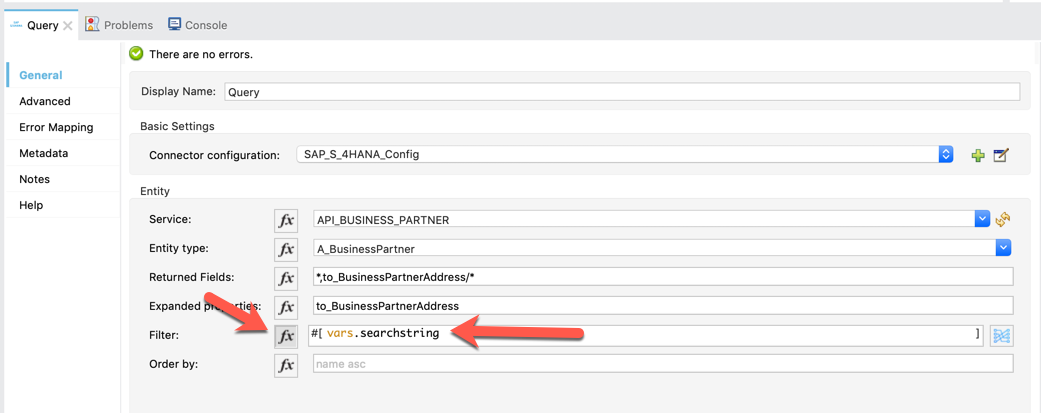
|
Type it on your own. Type "vars." and it will show you all available variables to be selected
|
Great work - this flow is now implemented as well.
Step 4 (OPTIONAL): Enhance the flow for the POST /accounts method
As you might notice this time we have a third flow that was generated from the API specification. From a migration standpoint, this flow will allow you to easily create accounts in S/4HANA with data from SAP ECC.
For this case we have to create a POST method which expects our data model in order to create accounts in S/4HANA.
|
This step is not required in order to proceed with the workshop. |
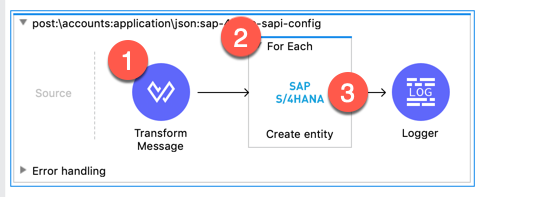
In your application canvas locate the flow post:\accounts and add the following components from the Mule Palette to the flow (starting from left to right).
-
Transform Message
-
For Each
-
SAP - Create Entity (place this component within the For Each scope)
It should look like the following screenshot.
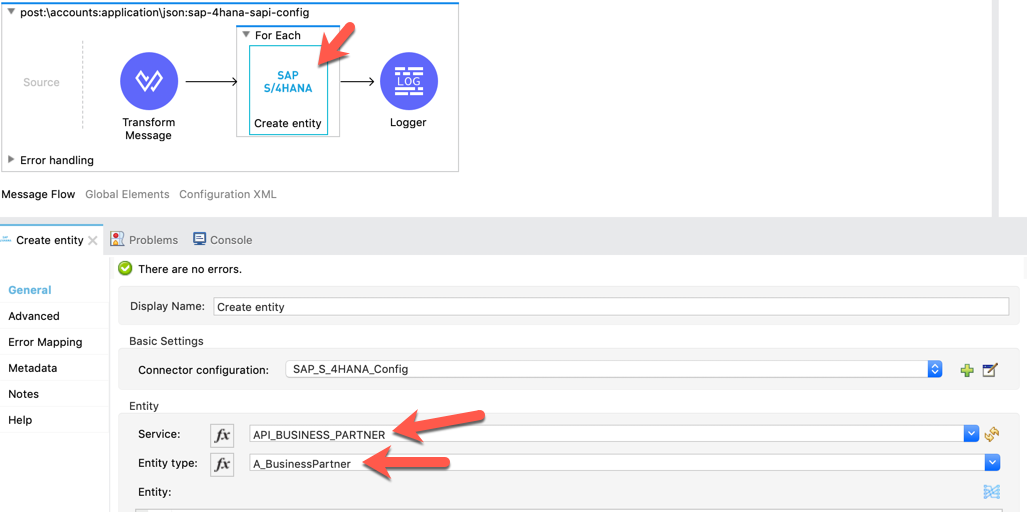
Before we map our expected input data model to the SAP data model we need to configure the Create Entity processor
Click on the Create Entity processor and fill the required fields in the option screen as per the table below:
Service: |
API_BUSINESS_PARTNER |
Entity Type: |
A_BusinessPartner |
Now let´s go back to the Transform Message component to setup the mappings. You can either try to map the fields on your own as you learned previously or copy-and-paste the DataWeave snippet below into the script editor.
Previously we have mapped "*BusinessPartnerFullName"* to "accountName" for retrieving account information. This is a read-only field so if you are mapping through drag-and-drop, make sure you map "accountName" to "OrganizationBPName1"
Additionally "BusinessPartnerCategory" needs to be set to "2" manually
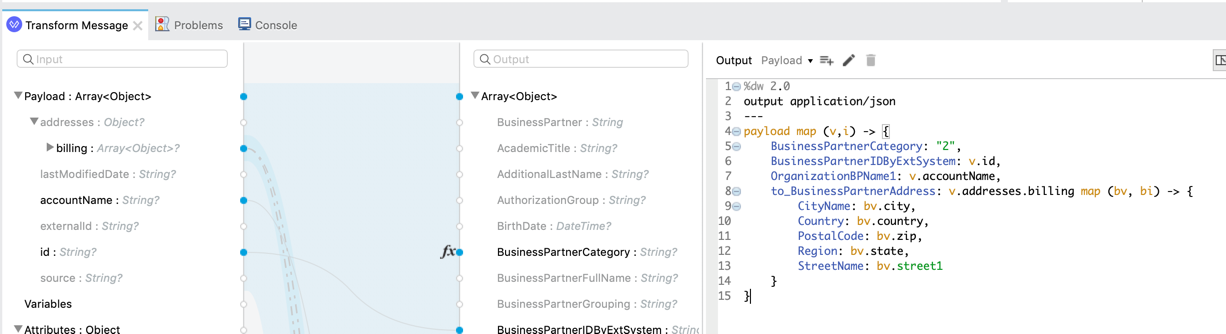
%dw 2.0
output application/json
---
payload map (v,i) -> {
  BusinessPartnerCategory: "2",
  BusinessPartnerIDByExtSystem: v.id,
  OrganizationBPName1: v.accountName,
  to_BusinessPartnerAddress: v.addresses.billing map (bv, bi) -> {
    CityName: bv.city,
    Country: bv.country,
    PostalCode: bv.zip,
    Region: bv.state,
    StreetName: bv.street1
  }
}
|
Please DO NOT use personal data (specifically PII) when testing the enhanced post endpoint. |
Summary
Congratulations! You have implemented an API completely from scratch that quickly and easily exposes data from SAH S/4HANA. We learned the following in this lab:
-
How to create a new Mule Project with an API specification.
-
How to configure the S/4HANA OData Cloud Connector.
-
How to configure and map flows for GET and POST methods.
In the next lab, learn how to securely deploy this API to CloudHub.