sap.user=
sap.pass=
sap.jcoClient=800
sap.jcoLang=en
sap.jcoAsHost=sapidp.demos.mulesoft.com
sap.jcoSysnr=00Module 1 Lab 2 - Implement the SAP ECC System API
Overview
In Module 1 Lab 1, we learned about Anypoint Exchange and the benefits that it provides to your organization by making collaboration easier. It allows your developers to easily save, discover, and reuse APIs and integration assets.
Additionally we also learned about the API Design / API Specification of the SAP ECC System API via the asset published in Anypoint Exchange. In this lab we’re going to take the API specification and learn about the following:
-
Use Anypoint Studio to implement the SAP ECC System API using the specification published in Anypoint Exchange.
-
Build and run the implementation locally in Anypoint Studio with the built-in Mule Runtime.
-
Leverage an example of the completed SAP ECC System API project and publish an instance to CloudHub.
Step 1: Create a new Mule project from the API specification
In this step we will create a new Mule application in Anypoint Studio from the SAP ECC System API specification that has already been defined and published into Anypoint Exchange.
|
These steps are for workshop attendees using the Remote Desktop that was provisioned. You can also run these steps on your own local instance of Anypoint Studio. Some screenshots may differ due to differences in Anypoint Studio versions. |
Start Anypoint Studio by double-clicking on icon on the desktop.

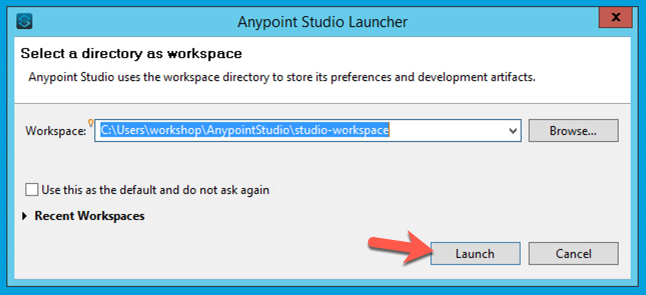
In the Anypoint Studio Launcher, keep the default Workspace location and click on Launch
1.1 Create a new Mule Project
From the Anypoint Studio menu, select File > New > Mule Project to create a new project. A window will pop-up where you can define the details of this new application.
Give your project a name like the following:
Project Name: <username>-sap-ecc-sapi
Under the API implementation section, click on the Download RAML from Design Center tab and click on the button next to the Location field.
|
If you can’t see the button next to the Location field, expand the window until you can see it. |

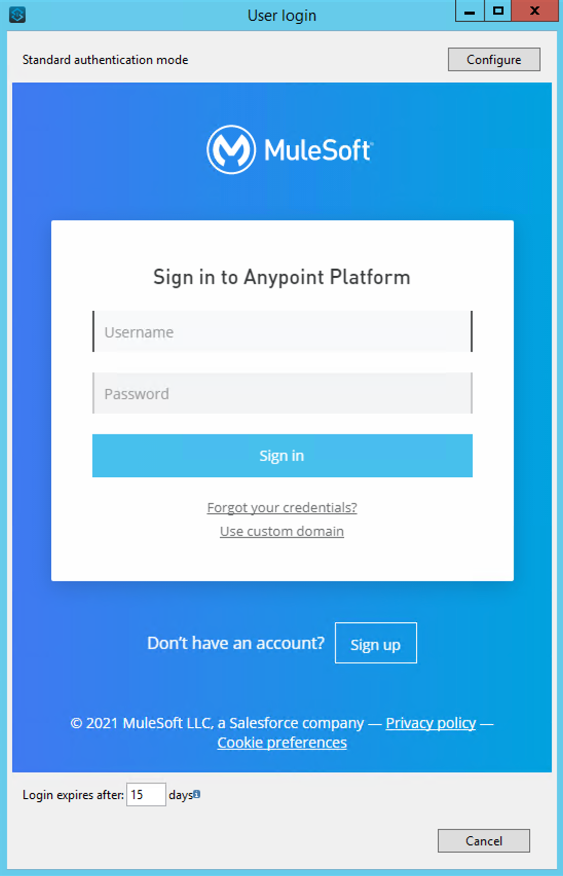
It should take you to the Browse Design Center for APIs window. If it asks you to login, use the Anypoint Platform account that was provisioned for this workshop.
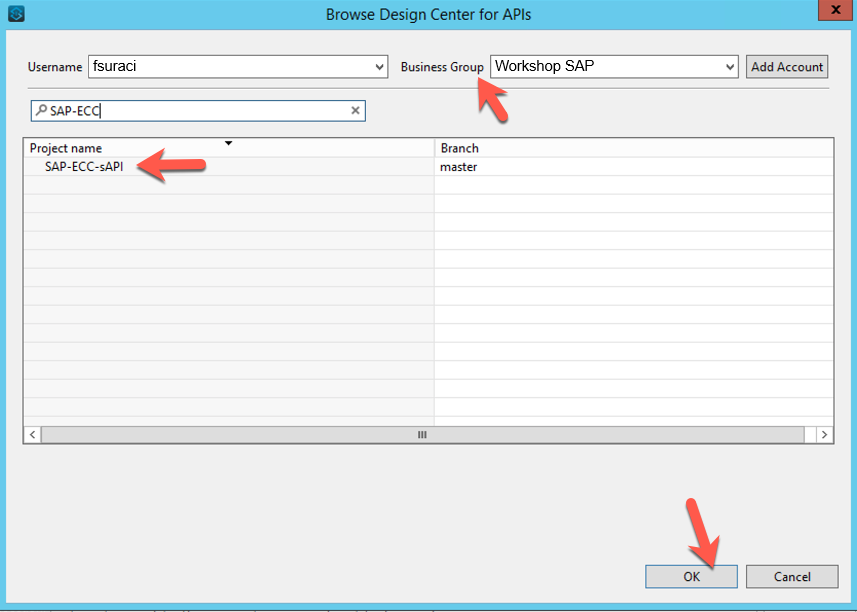
Otherwise, select the correct Business Group at the top right. Then in the search field, type in SAP-ECC.
From the list of project names, select SAP-ECC-sAPI and click OK
Now click Finish. This will create a skeleton project that implements your API.
|
If you cannot find the SAP-ECC-sAPI in the window that opens after you have logged in, start typing the API name under the type filter text. By default only a limited number of APIs are shown by default in this window. |
Let´s explore what was automatically generated.
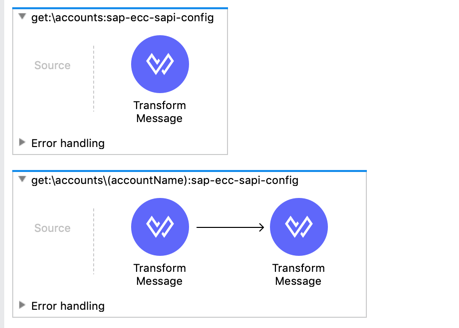
At the top of the diagram you will see a flow called sap-ecc-sapi-main and api-console followed by flows, one for each method defined in the RAML.
The flows below are defined by your API Design in the RAML file. Typically, there will be flows that look like this get:\resource, post:\resource, put:\resource, etc. Note that the name of the flow is very important for the APIkit router to be able to route the request to the appropriate flow - you don’t want to change these.
When APIkit detects example data in the response of a method in the RAML it inserts a Dataweave Transform Message into the flow which returns the static response specified by the example data reference.
The static response returned by the auto-generated Dataweave Transform Message allows you to test the API as a stub immediately after generation. Obviously these flows can be enhanced to provide more advanced mock services as well as evolve them into full API implementation as we will see in the next lab.
Besides the sap-ecc-sapi-main and sap-ecc-sapi-console flow also our two designed flow for account were created and filled with mocking data
-
get:\accounts
-
get:\accounts\(accountName)
Step 2: Enhance the initial flows scaffolding for the GET /accounts method
In this step, we want to implement the flow to retrieve a list of accounts from SAP ECC. Additionally we also want to include the accounts' address data. We’ll do this by calling the BAPI/RFC function.
We’ll limit the number of accounts returned from the function call to 5 for simplicity.
1.1 Create a global configuration file.
In the project tree navigate to src/main/resources, right click New → File
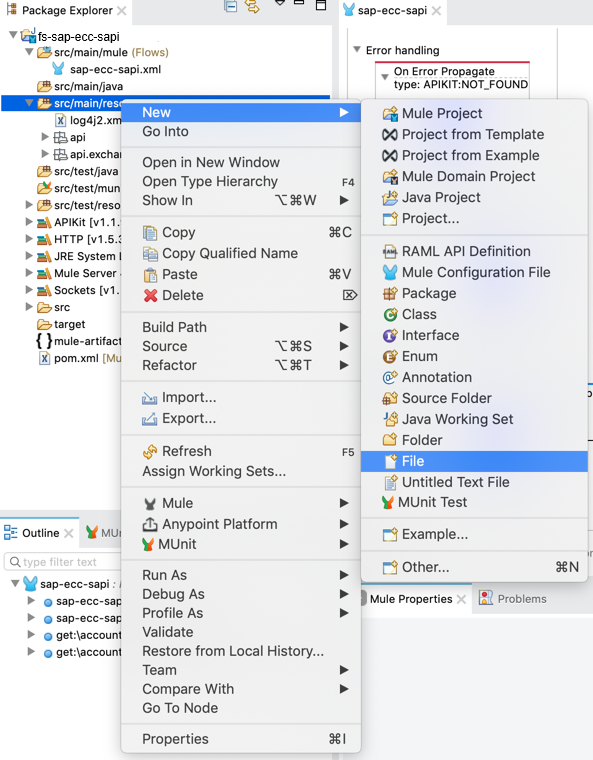
-
File Name: app.properties
-
Click Finish
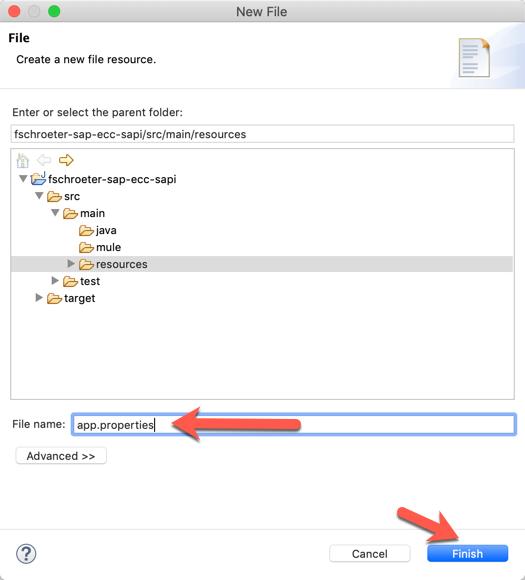
Copy the snippet below and paste it to your app.properties file.
|
Obtain the username and password from your instructor or you can use your own SAP ECC instance credentials. |
Save your app.properties file to reflect your changes

Next, we’ll associate the configuration file to our application. Navigate back to your application canvas and locate the Global Elements option
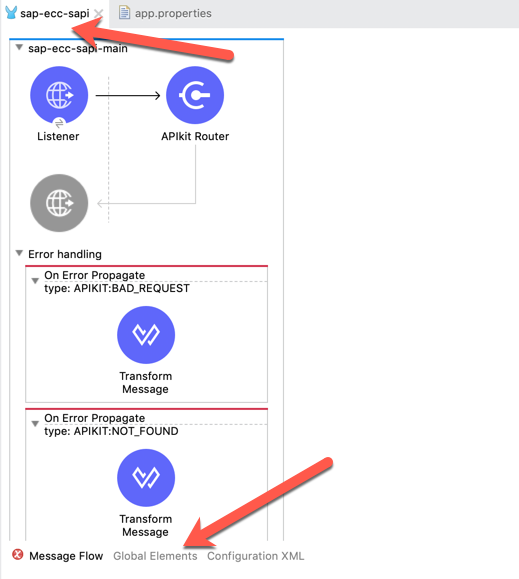
-
Within Global Elements
-
1. click Create
-
2. search for Prop
-
3. select Configuration Properties
-
4. click Ok
-
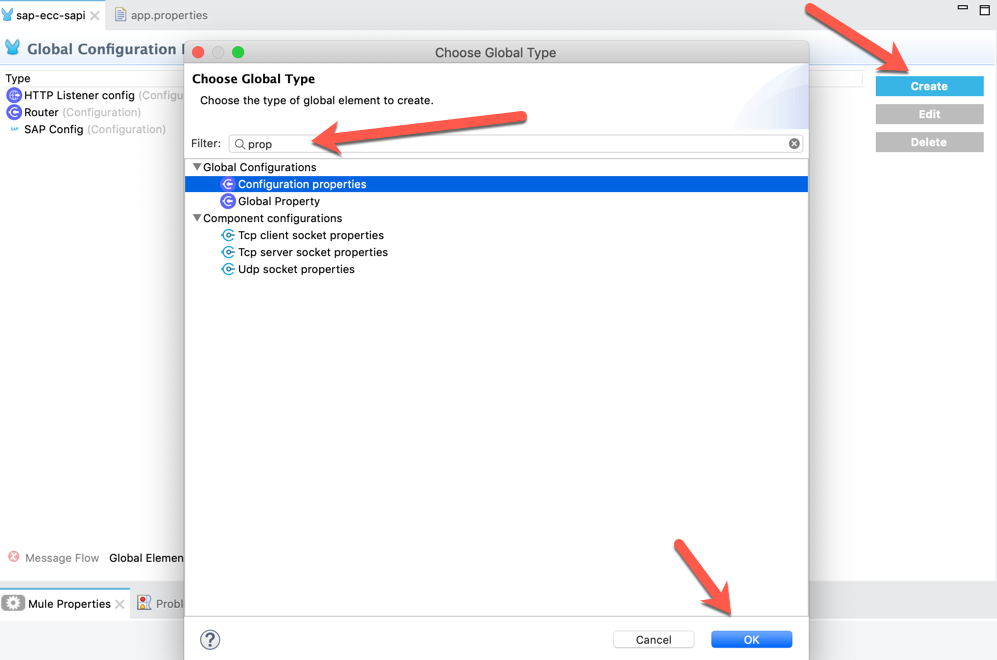
-
An option menu will open
-
1. Click on the 3-dot menu next to the File field.
-
2. Select your app.properties file
-
3. Click Ok
-
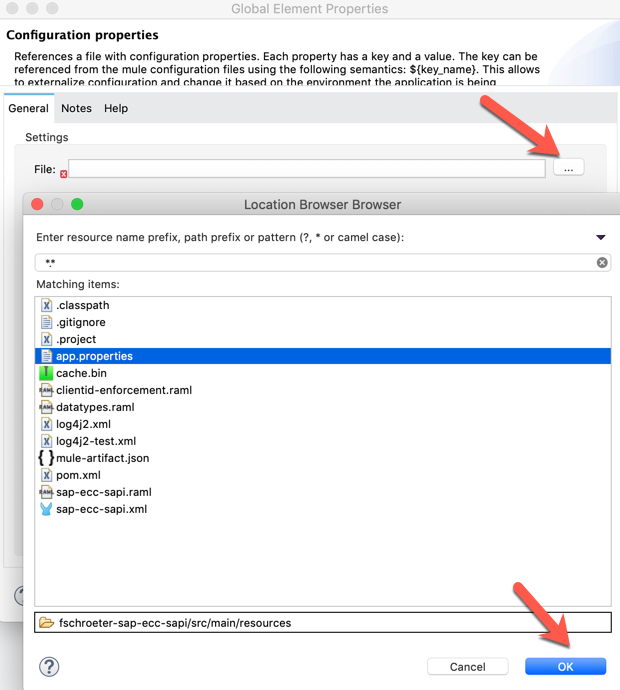
-
Once everything is saved, please navigate back to your application canvas for the next step by clicking Message Flow
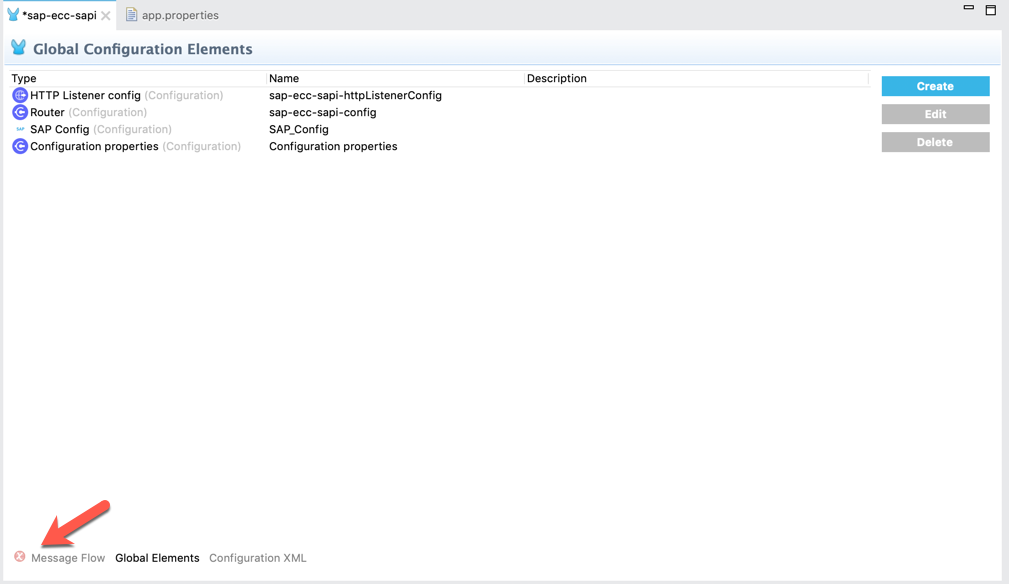
1.2 Configuring the SAP Connector
In your application canvas locate Search in Exchange on the right in the Mule Palette.
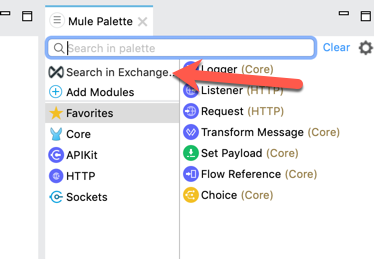
-
Enter SAP in the search field
-
Add the SAP Connector - Mule 4 to the selected modules
-
Click Finish
|
Always select the latest version of the connector. |
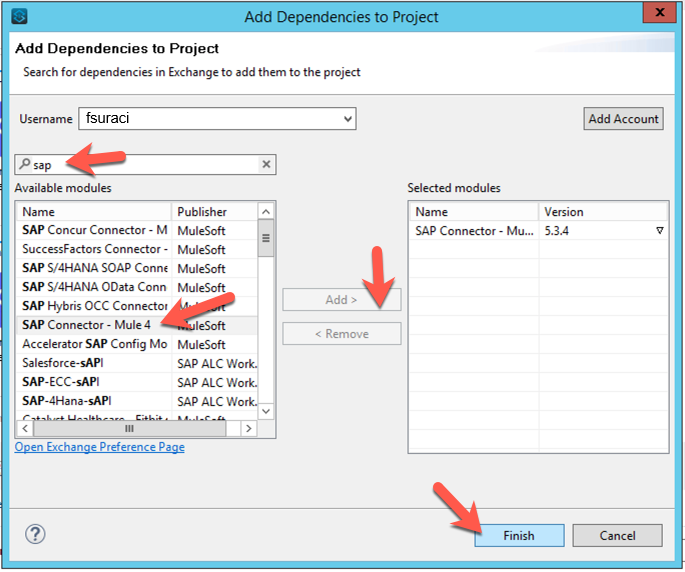
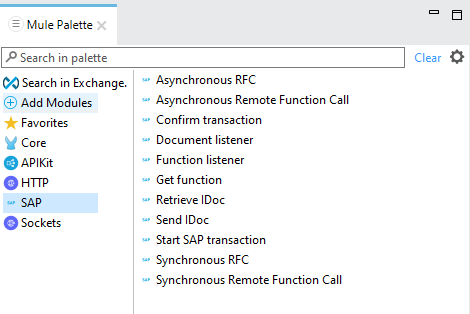
The SAP Connector has now been added to your project.
-
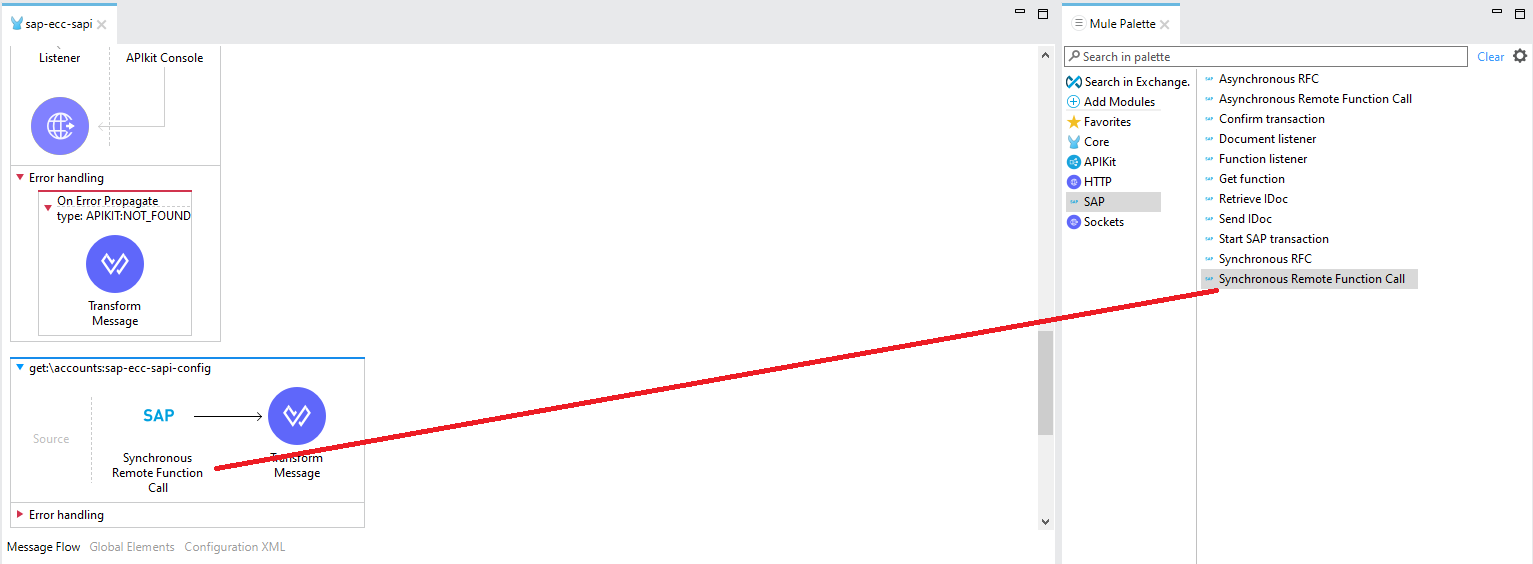
In your application canvas locate to the flow get:\accounts
-
In the Mule Palette locate the Synchronous Remote Function Call
-
Drag the Synchronous Remote Function Call by holding your mouse down to the flow and place it right before of the Transform Message
The SAP ECC Connector requires the SAP Java Connector libraries for the interaction via JCO and IDoc.
|
You should have access to the JCo libraries with your SAP subscription. You can download the installation files from SAPNet at http://service.sap.com/connectors. |
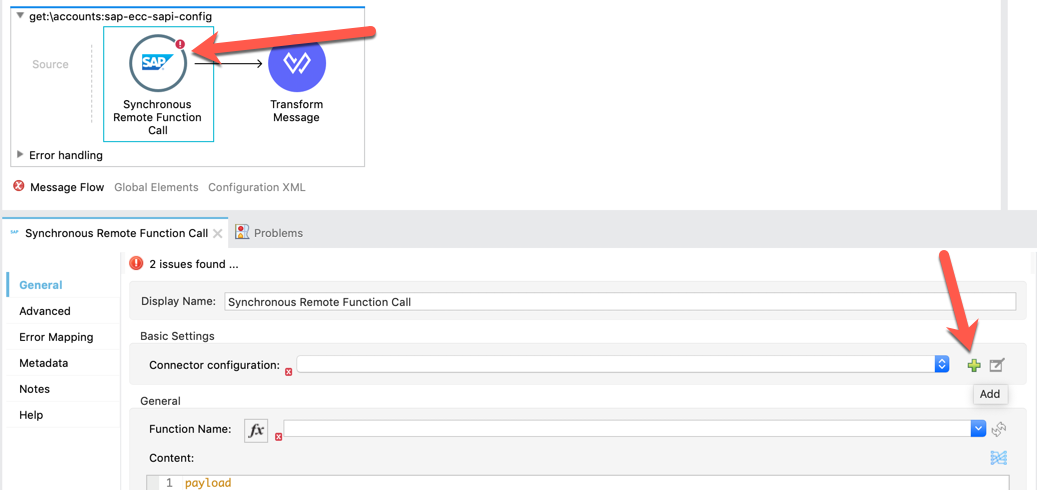
Navigate to the connector configuration by clicking the Synchronous Remote Function Call operation and click on the green plus sign next to the Connector configuration field in the Basic Settings section.
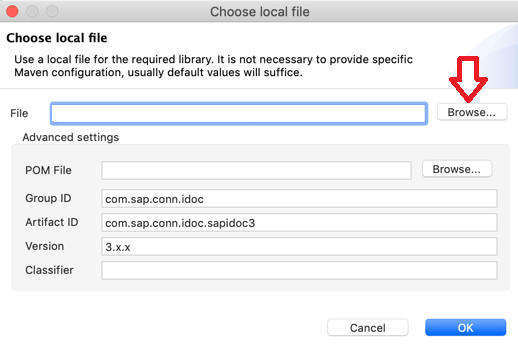
In the window that pops up, we want to setup the required libraries for SAP. Under the General > Required Libraries section, click on the Configure button and select Use local file

In the Choose local file window, click on Browse… and locate the file for each library. Click on OK after locating the file. The first two should be set to the following:
-
IDoc Library - sapidoc3.jar
-
JCo Library - sapjco3.jar
For the JCO native Library, they are platform specific. When you go to browse and select the files, be sure to change the dropdown to the specific extension you’re looking for.
-
Windows - sapjco3.dll
-
Mac OS - libsapjco3.jnilib
-
Linux - libsapjco3.so
Once completed, all the Libraries should show a green circle with a check mark next to them.
Next change the Connection type at the top to Simple connection provider
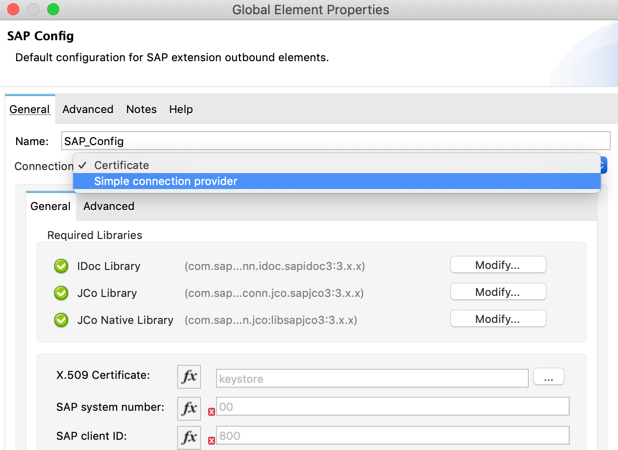
Once the Connection type is changed, lets use the global configuration properties we created earlier to provide all necessary connection information.
In Mule you can refer to your properties with this syntax ${alias.property}
Fill the required fields with the corresponding property placeholders below
Username: |
${sap.user} |
Password: |
${sap.pass} |
System number: |
${sap.jcoSysnr} |
Client: |
${sap.jcoClient} |
Application server host: |
${sap.jcoAsHost} |
When everything is entered, you can verify the connection by clicking on Test Connection at the bottom.
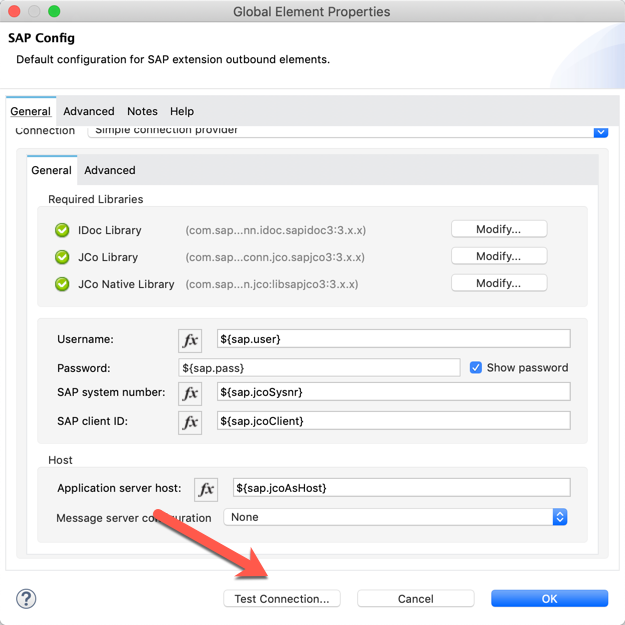
If everything was configured successfully, you should see the window below.

Click on OK to close the Connector configuration window.
Next, select the BAPI to be used in our sRFC processor. By clicking the drop down button, Anypoint Studio lists all available BAPIs of the connected SAP ECC system. This highly adds transparency to our project as the developer can explore all available BAPIs.
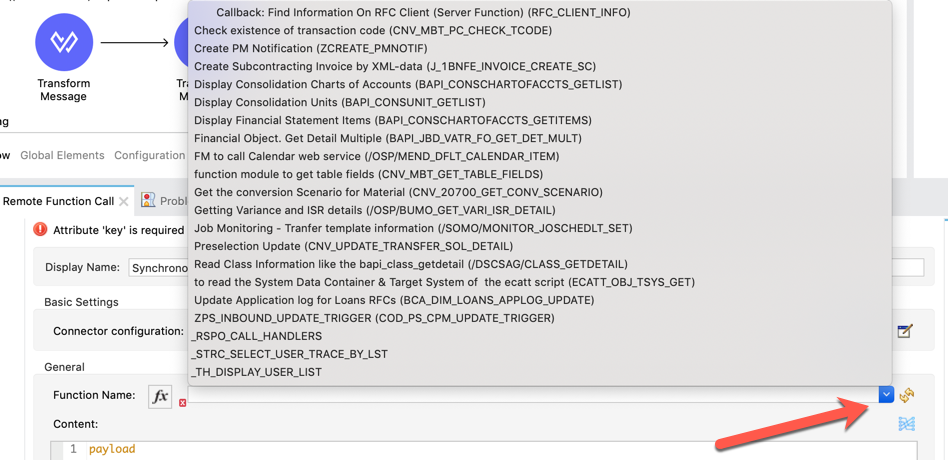
Select BAPI_CUSTOMER_GETLIST. You can also copy BAPI_CUSTOMER_GETLIST and paste it into the Function Name input field. Click Save or CTRL + S to save all the changes we’ve made.
The connector will now fetch all Metadata from the BAPI and will populate all available elements on the right in the Input and Output tab. We can now explore the expected input metadata.

In order to provide the required input for the BAPI we need to prepare the message using the Transform Message component which you can find in the Mule Palette
Drag the Transform Message Component from the Mule Palette in front of the Synchronous Remote Function Call operation.

Now you can see in the options of the Transform Message the fields that the SAP BAPI expects from the source.
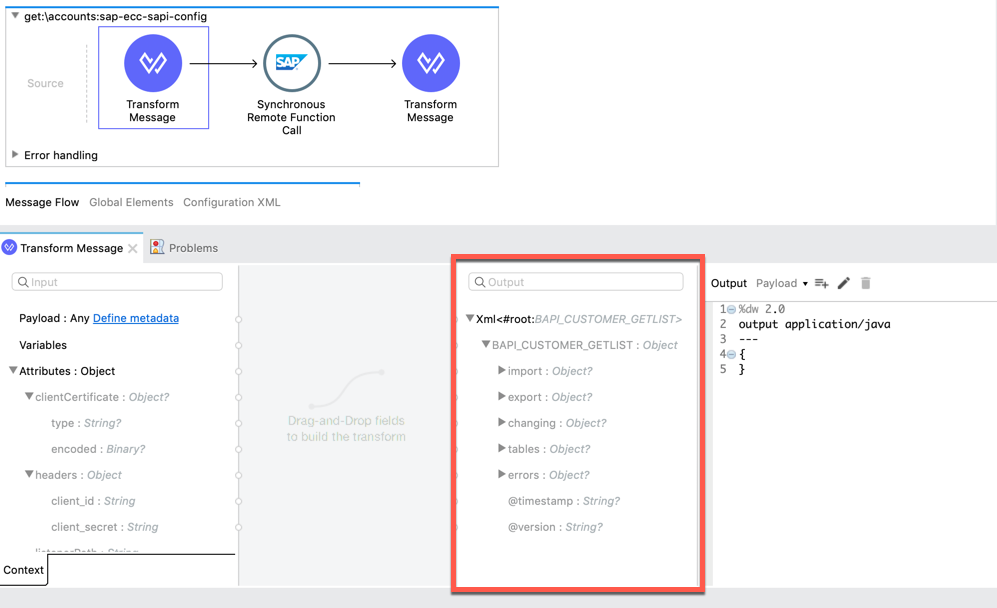
On the right side, you can set the message that needs to be send to the BAPI using Data Weave
|
DataWeave is an scripting language developed and used by MuleSoft in order to transform and manipulate the Mule Message. Learn more about DataWeave here: https://docs.mulesoft.com/mule-runtime/4.2/intro-dataweave2 |
When your are familiar with the BAPI structure you can also double click on the available options and Anypoint Studio will generate some of the DataWeave script for you.
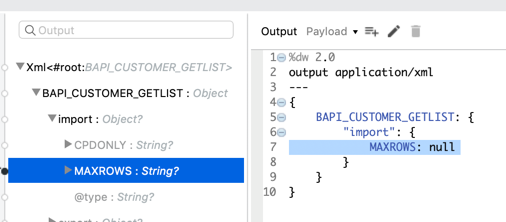
For today we have already prepared this for you. Copy the DataWeave snippet below and paste it into the Transform Message worksheet. Make sure to replace the entire content
%dw 2.0
output application/xml
---
{
	BAPI_CUSTOMER_GETLIST: {
		"import": {
			MAXROWS: "5"
		},
		tables: {
			IDRANGE: {
				row: {
					SIGN: "I",
					OPTION: "CP",
					LOW: "*"
				}
			}
		}
	}
}
The result should look like this
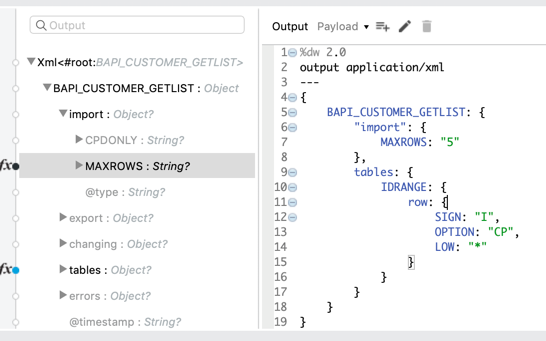
As we have now prepared our BAPI call, we need to map the response to our desired data format
Click on the Transform Message at the end of this flow
In general you can use the drag and drop utility in the Transform Message to map your data model on the left to your data model on the right. The DataWeave script will then be generated for automatically.
In order to speed this up, we have created the DataWeave snippet below to be pasted into the Transform Message worksheet.
Please copy the snippet below into your worksheet. Make sure to replace the entire content
%dw 2.0
output application/json
---
payload.BAPI_CUSTOMER_GETLIST.tables.ADDRESSDATA.*row map (v,i) -> {
	id: v.CUSTOMER,
	accountName: v.NAME,
	source: "ECC",
	addresses: {
		billing: [{
			zip: v.POSTL_COD1,
			country: v.COUNTRY,
			city: v.CITY,
			street1: v.STREET,
			state: v.REGION,
			country_ISO2: v.COUNTRYISO
		}]
	}
}
You can see how DataWeave detects both data models and visualizes the mapping.
Step 3: Test the implementation locally
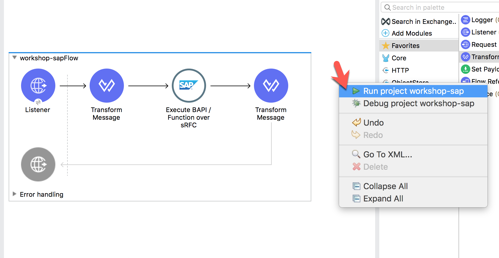
With the build in Mule Runtime of Anypoint Studio Developers can test their implementation locally. In your application canvas, right click in any white space and click Run Project
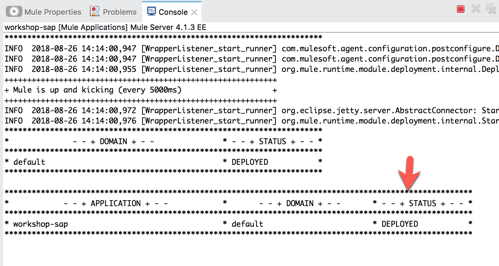
The Console will display logging information as the project is packaged and deployed to the local Mule Runtime. Wait for the status to show DEPLOYED before moving to the next step.
On the left side, the APIkit Console tab will appear. Click on Open Console and a new browser tab will open. In the API Kit Console, navigate to the implement GET method of our implemented resource /accounts
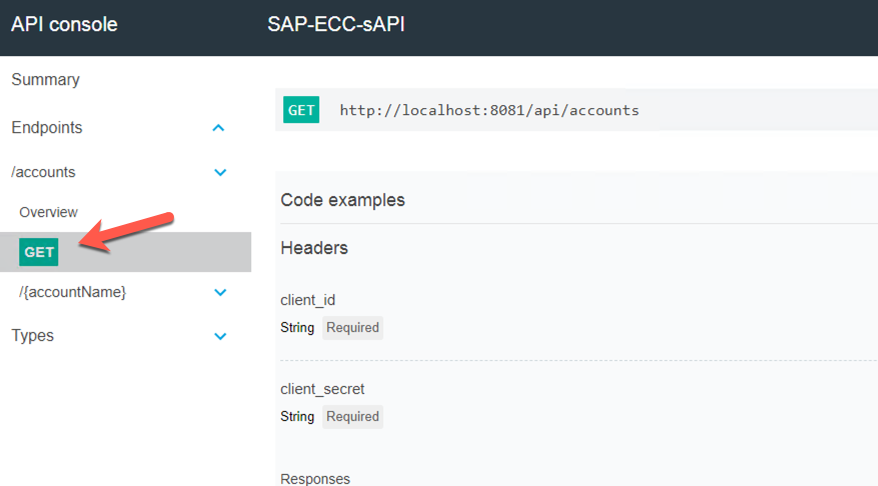
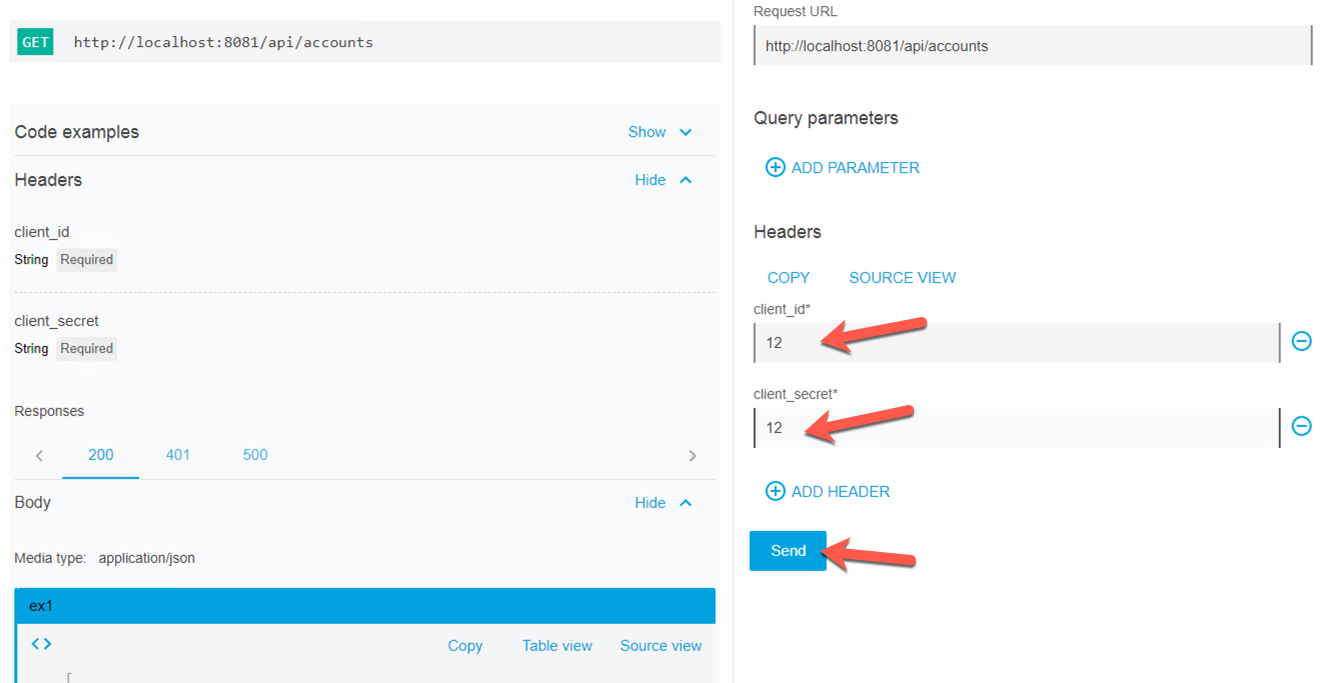
Here you can explore the API specification and test it out. Navigate to the Headers section and fill in the client_id and client_secret field with anything. These can be any value as of now as we are testing the implementation locally and not yet connected to API Manager. Go ahead and click on SEND
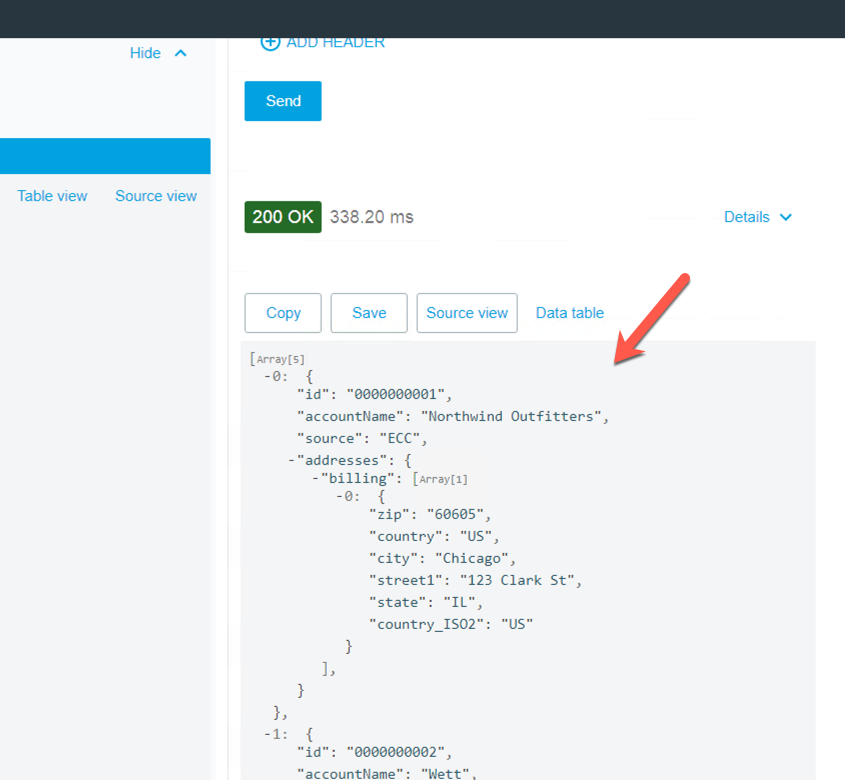
The console will show the result - connecting to SAP ECC and retrieving account data including address details. As you will notice this array of object is not the original data format as we have mapped it to our common data model.
When testing locally, any client such as Postman, can of course also be used.
Summary
Congratulations! You have built a SAP ECC System API that calls a BAPI to retrieve a list of accounts. You re-used a pre-built API specification that was published to Anypoint Exchange and saved your self a considerable amount of development time.
In less than 30 minutes, you configured and tested connection to SAP ECC, and easily mapped the fields that you wanted to expose based on a API specification. In the next lab, we’re going to deploy this API to CloudHub, our iPaaS solution and make the API availabe for other projects.


